
Manually rolling up a power window requires careful detachment of the glass from the motor or regulator. Secure it with a stick‚ loop‚ or similar tool to hold it in place temporarily. This method ensures safety and stability until proper repairs can be made‚ preventing further damage or potential hazards.
Understanding the Importance of Manual Window Roll-Up
Manually rolling up a power window is crucial for ensuring safety and preventing damage when the automatic mechanism fails. This method allows temporary operation of the window‚ maintaining visibility and security. It prevents glass shattering or misalignment‚ which could lead to costly repairs. By detaching the glass from the motor or regulator and securing it with a stick or loop‚ you can hold the window in place until professional assistance is available. This technique is especially useful in emergencies‚ such as when the window is stuck or the power system fails entirely‚ ensuring stability and preventing further issues.
Key Tools and Materials Needed
To manually roll up a power window‚ essential tools include a screwdriver for removing door panels‚ a prying tool for gently lifting the panel‚ and a stick or loop to hold the glass in place. Protective gloves and safety glasses are crucial for safeguarding against sharp edges or breaking glass. Additional materials like masking tape can help temporarily secure the window. Electrical tools‚ such as wire cutters or pliers‚ may be needed to disconnect or reconnect wiring. Ensure all tools are readily available to streamline the process and minimize risks during the manual roll-up procedure.

Safety Precautions
Always wear protective gloves and eyewear when manually rolling up a power window. Be cautious of sharp edges and potential glass breakage to avoid injuries. Proceed patiently.
Disconnecting the Battery
Disconnecting the battery is a crucial safety precaution when manually rolling up a power window. Locate the car battery‚ typically found in the engine compartment‚ and use the appropriate tools to disconnect the negative terminal. This step prevents any accidental power surges or unexpected motor activation. Ensure the battery is completely disconnected before proceeding with any manual adjustments. Always follow proper safety protocols to avoid potential electrical hazards or injuries. This precaution is especially important when working with electrical systems or motors connected to the window mechanism.
Wearing Protective Gear
Protective gear is essential to ensure safety while manually rolling up a power window. Always wear gloves to prevent cuts and abrasions from sharp edges or broken glass. Safety goggles shield your eyes from debris‚ and a dust mask can protect against airborne particles. Proper footwear is also recommended to prevent injuries from tools or falling objects. These precautions minimize risks associated with handling electrical components‚ glass‚ and mechanical parts. Ensuring personal safety allows you to focus on the task without unnecessary hazards‚ making the process smoother and more efficient. Always prioritize protection before starting any manual adjustments.

Tools and Materials Required
Screwdrivers‚ wrenches‚ pliers‚ a stick or loop‚ electrical tape‚ gloves‚ and safety goggles are essential for safely and effectively manually rolling up a power window.
Basic Toolkit
A basic toolkit is crucial for manually rolling up a power window. Essential tools include screwdrivers (Phillips and flathead)‚ wrenches or pliers for gripping‚ and Torx bits for specific screws. A plastic trim tool helps pry panels without damage‚ while gloves protect hands from sharp edges. These tools ensure safe and efficient disassembly of door panels and access to the window mechanism. They also help prevent damage to the vehicle’s interior components‚ making the process smoother and more controlled. Having these tools ready is the first step toward a successful manual window roll-up.
Additional Materials for Securing the Window
To secure the window manually‚ additional materials like a stick‚ loop‚ or strong wire are essential for holding the glass in place. Duct tape or rope can also be used to temporarily fasten the window‚ ensuring it remains stable. For a more secure hold‚ adhesive Velcro strips or clamps can be applied to keep the glass aligned properly. These materials prevent the window from shifting or falling‚ providing a safe and temporary solution until professional repairs are made. They are easy to find and use‚ making the manual roll-up process safer and more effective in emergencies.

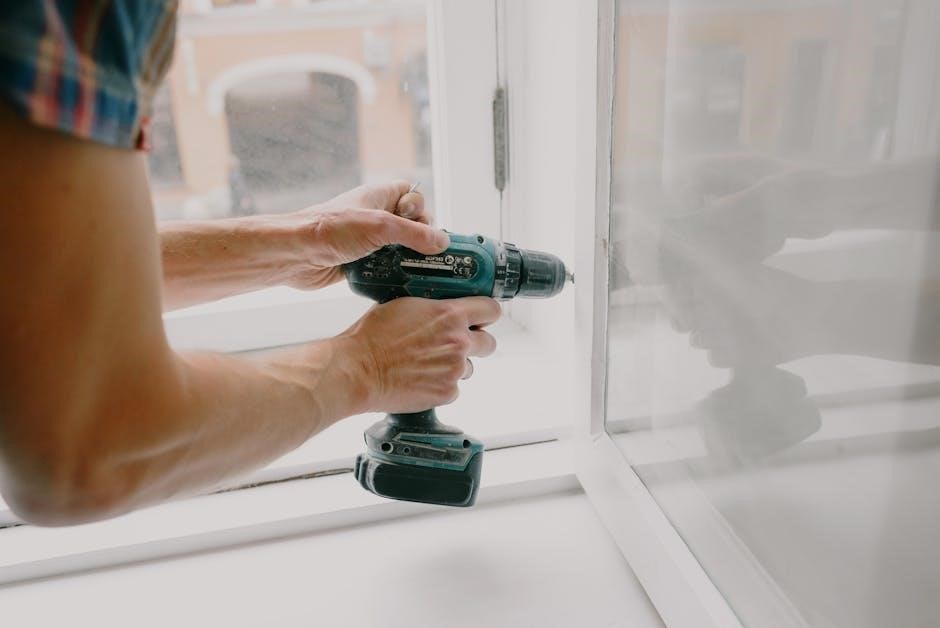
Step-by-Step Process to Remove the Door Panel
Begin by locating and removing screws or clips around the door panel edges. Gently pry the panel off‚ taking care not to damage it. Disconnect electrical connectors carefully to avoid harm. This grants access to the window mechanism for further repairs or adjustments.
Locating Screws and Clips
To begin‚ inspect the door panel for visible screws or clips. These are often found around the edges‚ near the door handle‚ or behind speakers. Use a screwdriver to remove any exposed screws. Hidden clips may require a pry bar for gentle removal. Check online for specific guidance for your car model‚ as locations can vary. Work carefully to avoid damaging the panel or surrounding trim. Once all screws and clips are removed‚ the panel should come off easily‚ granting access to the internal mechanisms for further repairs or adjustments.
Gently Prying Off the Door Panel
Start by gently prying the door panel at the bottom edge‚ using a screwdriver or pry bar. Work your way around the panel‚ applying careful pressure to release hidden clips. Avoid applying too much force to prevent damaging the panel or surrounding trim. If clips are stubborn‚ consider using a plastic trim removal tool to minimize risk of breakage. Move methodically‚ ensuring all fasteners are released before attempting to remove the panel completely. This approach ensures safe access to the internal mechanisms without causing unnecessary damage.
Disconnecting Electrical Connectors
Once the door panel is partially removed‚ locate the electrical connectors attached to the window switch and motor. Use a screwdriver or connector removal tool to gently release these connectors. Carefully pull the connectors away from their sockets to avoid damaging the wiring or terminals. If the window switch is malfunctioning‚ disconnect it to prevent accidental power supply to the motor. For added safety‚ consider testing the motor by applying 12V power directly to the orange/white and white/black wires‚ ensuring proper polarity for correct operation.

Accessing the Window Mechanism
After removing the door panel‚ you’ll have access to the window motor and regulator. Disconnect the electrical connectors carefully to avoid damage. This allows you to work on the mechanical parts safely.
Identifying the Window Regulator
The window regulator is a mechanical assembly connected to the motor‚ responsible for moving the glass up and down. It typically consists of a track system with cables or gears. Identifying this component is crucial for manual operation. Once located‚ you can disconnect it from the motor to manually lift the window glass. Ensure all electrical connectors are detached before proceeding to avoid any accidental power activation. This step is essential for safe and effective manual adjustment.
Understanding the Motor and Gear System
The window motor drives the regulator‚ converting electrical energy into mechanical motion. The gear system translates this motion into vertical movement for the glass. Running 12V directly to the motor can test its function‚ as polarity determines direction. By applying power to specific wires‚ you can bypass the switch‚ allowing manual control. This setup ensures smooth operation but requires careful handling to avoid damage or reverse polarity issues. Understanding this mechanism is vital for safely managing the window’s movement without relying on the vehicle’s electrical system.

Detaching the Window Glass
Detaching the window glass involves removing clips or screws and carefully lifting it away from the door frame‚ ensuring it’s securely held to prevent shattering.
Removing Clips or Screws
Start by locating the clips or screws that hold the window glass in place. Use a screwdriver to remove any visible screws or bolts securing the glass. For clips‚ gently pry them open with a flat tool. Be careful not to damage the door frame or the glass. Once the clips or screws are removed‚ the glass should be free to move. If the glass feels stuck‚ check for additional fasteners or adhesive residue. Wearing gloves can protect your hands from sharp edges. This step ensures the glass is safely detached before manual adjustment.
Carefully Lifting the Glass
Once the clips or screws are removed‚ carefully lift the glass by gripping it firmly from the edges. Wear gloves to prevent injury from sharp edges. The glass may be heavy‚ so ensure you have a secure hold. Slowly pull it upward‚ checking for any remaining fasteners or adhesive that might still be holding it in place. If the glass feels unsteady‚ use a second person to assist for better control. Avoid sudden movements to prevent the glass from shattering or causing injury. Once lifted‚ use a stick‚ loop‚ or similar tool to stabilize it temporarily while securing it in the desired position.
Manually Raising the Window
Use a stick or loop to hold the glass‚ then carefully align it with the window frame. Move cautiously to avoid damage or injury.
Using a Stick or Loop to Hold the Glass
A sturdy stick or loop can temporarily hold the window glass in place. Gently slide the stick between the glass and the door frame‚ ensuring it’s secure. This prevents the glass from falling while you work. Make sure the stick is strong enough to support the weight and doesn’t damage the glass or surrounding materials. This step is crucial for maintaining control and safety during the manual roll-up process.
Aligning the Glass Properly
Proper alignment is crucial when manually rolling up a power window. Ensure the glass is guided smoothly into the door frame‚ avoiding any tilting or uneven positioning. Check for alignment guides or marks on the glass and door frame to help with accuracy. Use a stick or loop to hold the glass steady‚ ensuring it moves upward without shifting. Proper alignment prevents damage to the window regulator‚ motor‚ or surrounding mechanisms. Handle the glass carefully to avoid scratches or breaks‚ ensuring it fits securely into its track for a stable and safe solution.
Securing the Window in Place
After manually rolling up the window‚ use a stick‚ loop‚ or temporary bracket to hold it in place. Ensure the glass is aligned properly and secure to prevent movement or potential breakage. This temporary fix keeps the window stable until professional repairs are made‚ ensuring safety and preventing further damage to the window or door mechanism.
Temporarily Fixing the Glass
To temporarily fix the glass‚ carefully align it with the window frame and use a sturdy stick‚ loop‚ or temporary bracket to hold it in place. Ensure the glass is level and secure to prevent movement or breakage. Apply minimal pressure and check alignment by observing the gap around the window. For added stability‚ use adhesive tape or a clamp to reinforce the hold. This temporary solution keeps the window in position‚ providing a safe and stable setup until professional repairs or further adjustments can be made. Always prioritize caution to avoid injury or further damage.
Ensuring Safety and Stability
After temporarily fixing the glass‚ ensure it is tightly secured to prevent movement. Check the holding mechanism’s strength and consider adding clamps or adhesive tape for extra stability. Gently tug the glass to confirm it holds firmly. Avoid sudden movements that could shatter the glass. Inspect the window frame for any debris or obstructions that might interfere with alignment. Weather conditions‚ such as rain or extreme temperatures‚ should also be considered to prevent further damage. Clean the area around the window to ensure proper sealing. Always prioritize safety to avoid accidents and ensure the temporary fix remains stable until professional repairs are made.
Troubleshooting Common Issues
If the window doesn’t budge‚ check the switch functionality and ensure it’s not locked. Applying direct power to the motor can help diagnose electrical issues quickly.
Dealing with a Stuck Window
A stuck window can occur due to electrical or mechanical issues. First‚ check if the window switch is functioning and not locked out. If the window doesn’t move‚ ensure the motor is receiving power by testing the electrical connections. Applying direct power to the motor can help determine if the issue is electrical. For mechanical jams‚ gently pry the window or use a stick to guide it upward. Avoid excessive force to prevent glass damage. Once unstuck‚ secure the window in place to ensure safety and stability until a permanent repair is made.
Checking the Window Switch
Begin by ensuring the window switch is functional and not locked out. Test all switches related to the window to confirm they are operating correctly. If the window doesn’t respond‚ check the master switch for any lock-out features. Verify the switch’s electrical connection and ensure proper polarity‚ as most motors rely on polarity changes to move up or down. Use a multimeter to test for power at the switch terminals. If the switch is faulty‚ bypass it temporarily by applying direct power to the motor’s wires. This step can help identify if the issue lies with the switch or the motor itself.
Reassembling the Door Panel
Reattach all screws and clips securely‚ ensuring proper alignment. Reconnect electrical connectors carefully to avoid damage. Replace any protective coverings and test the door panel to ensure it functions smoothly. This step restores your car’s interior to its original state‚ maintaining both functionality and aesthetics. Remember to double-check all connections for safety and durability.
Reattaching Electrical Connectors
Reattaching electrical connectors requires care to ensure proper functionality. Start by locating the connectors you disconnected during the door panel removal. Inspect them for any damage or debris. Use needle-nose pliers or your hands to firmly plug them back into their respective ports. Make sure they click securely into place. Avoid forcing connectors‚ as this could damage the terminals. If a connector seems loose‚ gently wiggle it to ensure a snug fit. Once all connectors are reattached‚ test the window switch to confirm everything works as expected. Properly secured connectors are vital for maintaining electrical continuity and ensuring the window operates safely.
Securing the Door Panel Properly
Securing the door panel properly is crucial for restoring your car’s functionality and appearance. Start by aligning the panel with the door frame‚ ensuring all clips and screws match their original positions. Gently push the panel into place until you hear the clips snap back in. Reinstall all screws or bolts‚ tightening them firmly but avoid overtightening‚ which could damage the panel or strip the threads. Double-check that all electrical connectors are securely attached before finalizing. Once everything is in place‚ test the door handle and any buttons to ensure proper operation. A properly secured door panel ensures safety and prevents rattling or further damage while manually rolling up the window.
Final Testing and Inspection
Testing the manual fix ensures the window operates smoothly. Lower and raise the glass to confirm stability. Check that the door panel is securely attached and all electrical connectors are properly secured. Verify there are no signs of damage and that the temporary solution holds over time.
Testing the Manual Fix
After securing the window‚ test the manual fix by gently lowering and raising the glass. Ensure it moves smoothly without resistance or misalignment. Check for any gaps or instability‚ making adjustments as needed. Verify that the temporary hold‚ such as a stick or loop‚ maintains its position securely. This step ensures the repair holds and functions effectively until a permanent solution is implemented. Proper testing prevents unexpected issues and confirms the success of the manual roll-up method.
Ensuring Everything is Secure
After manually rolling up the window‚ inspect the temporary fix to ensure all components are tightly secured. Verify that the stick‚ loop‚ or other holding mechanism is firmly in place and does not shift when the door is moved. Check for any gaps between the glass and the door frame to maintain proper alignment. Ensure electrical connectors are safely reattached to avoid short circuits or malfunctions. Double-check the stability of the window glass and the door panel to confirm everything is locked in position securely. This step is crucial for preventing accidental movement or further damage while driving.